

My friend, Rachael, created this neat piece of art out of an old 5-panel door that she found next to a dumpster! Seriously, who throws away these things!!!?? So glad that she salvaged it!
She and her husband had lived in the Pacific Northwest for a few years before moving back to the DC area. When she thought about creating this piece, she took a good deal of time to plan out the theme. And to see her face light up when she talks about their time out West, I can understand why the area was a natural inspiration - the landscape and scenery, who wouldn't appreciate capturing that beauty? She choose her own photographs of the Olympic Peninsula, the Seattle market, the Cascade Mountains, and wildflowers in the Alpine Lake region of the Cascade Mtns. She printed photos, and then layered them {so some are thicker than others}, collaged together and then glued down with craft adhesive. Few coats of red paint and.... awesome! I love that she kept the door hardware.
Rachael is such a creative talent - always thinking of new ways to view familiar items, especially those dear to her heart. Oh, and she also does terrific graphic design - check out her site: rachaelhamm.com
September 10, 2007
5-Panel Door Art

More:
architectural salvage,
DIY
![]()
September 7, 2007
Painted brick rowhouse - finished!
Ta-daaa! As promised, here are the photos of our latest project - painting the front of our rowhouse. The "before" photo was taken the night we went to closing, back in January 2005... seems like eons ago. I can't believe it had taken us so long to actually tackle the front yard. We went back and forth about painting the concrete walk and wall. It was John's thought to one day take remove the concrete walk and eventually lay down brick or pavers... but not a priority any longer. So, I painted it with some porch & concrete floor enamel to match the window sills. Planted some seasonal mums, and my eternal favorite (earlier this summer) potato vines, and viola! ...a whole new, crisp look.
The door we found at Lowe's about 2 years ago -- a special order Jeld-Wen (if anyone was interested) - it comes unfinished, blonde wood. I stained it twice and put several coats of spar varnish to protect it from the elements. It's held up pretty well. Door hardware is from Lowe's. I've been obsessed with the oil-rubbed bronze fixtures - we put them throughout our entire house....I'll show more on those later. And our mailbox, my splurge -- from Restoration Hardware. I would actually live in that store if I could... that, or Anthropologie of course. The chair was a trash-day find -- John spotted that one on the side of the road in Alexandria -- I painted it last weekend.


Before

Measure your transom, so you know approximately how large your numbers should be. Create a template in Word or Photoshop like the one below and print out (any font your heart desires!) Tape template to outside of your transom window, making sure that the numbers are level and centered. On the inside, using an $2.99 gold paint marker (similar to this one, found at Michael's), trace out the numbers. I used a straight razor to clean up my edges. If you mess up, or don't like the outcome - just scrape off and try again. So easy!
**If you have any good suggestions for increasing your curb appeal, please do share :) **
 (images by RowHouse)
August 30, 2007
Refurbishing our stairwell banister
So, I've mentioned before that my husband and I purchased a rowhouse in Capitol Hill (Washington, DC) about 2 1/2 years ago...which has been my motivation and inspiration for this blog. Since then, we have spent countless hours refurbishing it to it's original grandeur. But we do it because we LOVE this stuff and we love old houses!
One of my first projects was the banister. It had been covered in 90 years worth of paint and grime, and instead of just slapping on a coat of white paint and calling it day (which, I can not lie, was my first inclination!)... I decided to tackle it with a heat gun, a 5-in-1 tool, and my trusty mouse sander. Not only is this a hot job, but a little dangerous too -- I suggest if anyone is interested in doing the same, wear gloves, long pants and long shirt (in case any of the peeled paint falls back onto you in the process, it won't burn you), and watch the area in which you are working carefully to avoid burning the wood. In the end, I stained it with MinWax Jacobean color. I thought that it might look really beautiful on the old pine. Then I put 2-3 coats of polyurethane to seal and protect it. I left the slats painted white because several had been replaced over the years, and would not have matched the stained color of the original banister.


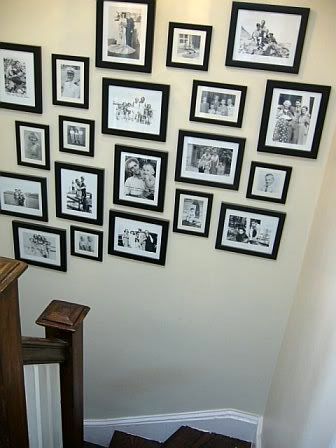
Also, in the same stairwell, we thought it would be fun to hang 20 different vintage family photos that we scanned from originals, and then printed them at home on our little Epson. Some of the originals were not black & white, so we converted them from color..and bumped up the saturation and brightness a little. I think gives the stairwell added interest - an otherwise unusable space, you know? And the light fixture - a total find at Lowe's - a steal at $60! You see similar ones at Pottery Barn for $300-$400. There are great finds out there if you hunt for them...

More:
DIY
![]()
August 21, 2007
Look in the Attic

How cute would these be on a painted black dresser?
I remembered seeing this lovely transformation (below) in a Cottage Living earlier this year. I think this might be my next furniture project... now, if only I had a place to put it!
More:
architectural salvage,
DIY,
tabletop
![]()
August 9, 2007
Blog Cabin
A rep for the DIY Network, Amie K., contacted me about their new show Blog Cabin premiering Aug. 16th {Thursday} at 9pm. She thought perhaps RowHouse readers would be interested... I do remember seeing something for this awhile back.
(Image from DIY Blog Cabin)
More:
DIY,
television
![]()
August 8, 2007
Increase your ceiling height, the cheaters way...
So my friend Libby taught me about this technique, and I love it for two reasons -- It saves money on costly large decorative molding pieces and it saves time instead of replacing all of your crown molding.
Here's what you do: Mark about 3 inches below the bottom of your existing crown molding. Choose another smaller piece of decorative molding that will lie flush to the wall. Moldings can usually be found at any hardware store. Have your handy husband cut the new small molding and install at your 3 inch mark. Finally fill in the all the holes with wood glue and caulk, sand, and paint the entire segment (including the wall in between the two pieces) so as to give the appearance of one LARGE decorative crown molding. Trust me, this makes your ceilings look much taller and walls more grand, drawing your eye up. ...And there you have it!
Note: Always take into consideration door and window frame heights. I wouldn't recommend bringing the molding down lower than those frames.
If you have any questions, leave in the comments section below...
(Image via flickr, notations are my own)
July 25, 2007
Top 10 Home TV Shows
John and I are obsessed with home renovation shows, especially the DIY Network. Does anyone else watch this channel??? Our entire DVR schedule is filled with Kitchen Renovations, Bathroom Renovations, Rock Solid, to name a few. The funny part - we have almost nothing left to do to our house. It's done. I suppose it is a sign of mild obsession if we're watching purely for entertainment purposes. Their shows are 100% hands-on, so that gets me excited. And the website is pretty helpful with lots of how-to's and videos. So it got me thinking that we actually tune in mostly to home shows when seasonal stand-by's aren't in the rotation... The Office, anyone? Best show ever. Anyway, I digress... I thought it would be fun to list my Top 10 Home TV Shows:
1.) Kitchen Renovations (DIY) - Paul Ryan and the moustache...
2.) Bathroom Renovations (DIY) - hit or miss with some taste selections, but I love the ideas
3.) Rock Solid (DIY) -- the banter between these 2 brothers is hilarious.
4.) Divine Design (HGTV) - Candace Olson is a miracle worker - I love almost all of her designs.
5. ) Real Estate Confidential (Fine Living) - makes me want to become agent in LA
6.) What you get for the Money (HGTV) - makes me want to live anywhere but in this market
7.) House Hunters (HGTV) - some of the comments from prospective buyers make me cringe, but overall, very entertaining
8.) Design Star (HGTV) - tuning in as a new viewer this season, jury is out whether I'll love it as much as Project Runway.
9.) Sweat Equity (DIY) - it's become our mantra, how could I not like this show?
10.) Wasted Spaces (DIY) - genius for hidden potential
Let me know your thoughts/objections/suggestions for new shows in the COMMENTS section below - would love to hear from you!
(logo from DIY)
More:
DIY,
television
![]()
July 20, 2007
Painting hardwood floors checkerboard

We did a much smaller version of this in our kitchen pantry 2 months ago. And normally I would not suggest painting over beautiful hardwood floors, especially old heart pine floors if you have them. I'm a hopeless romantic for old hardwood. However, in the event that you 1.) want a fresh change in one room... kitchen maybe? 2.) have a small space to experiment like a bathroom, or 3.) are planning to redo the floors anyway, this can be a fun DIY project. Here is a great how-to that I found archived on Cottage Living online.
Another great idea instead of going traditional black & white is to try mixing up the colors... think light brown & cream, or robin's egg blue & black on a screened-in porch. Or, only paint one of the squares, and the leave the other your floor's natural or stained color, then polyurethane over everything for good durability.
(Image from Cottage Living)
More:
DIY,
hardwood floors,
painting
![]()


