

I just read the newest issue of Cottage Living. And I love, love, love this idea from their 2007 Idea Home. So much so, that I fully plan to do something similar in our next kitchen (our current kitchen wouldn't really work with this). And I really love that this "recipe" below lets you choose your own color, instead of standard black. Oh, and that rustic sliding door -taken from an old bank in New Orleans - awesome.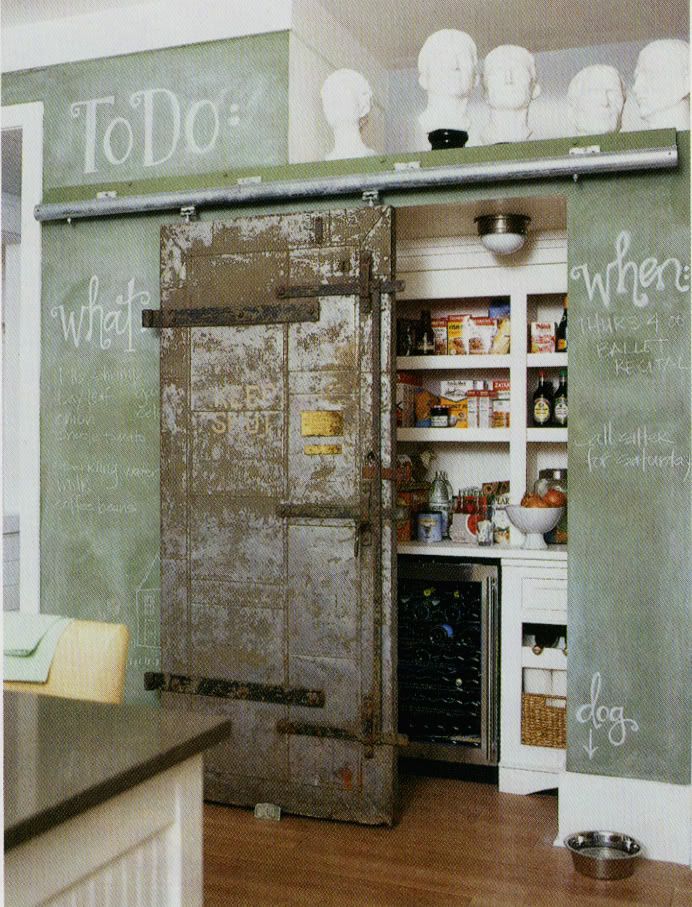
1. Pour 1 cup of acrylic latex paint, in the color of your choice, into a clean, 1-gallon bucket.
2. Add 2 tablespoons of dry, unsanded tile grout mix into the paint, and mix until the paint is smooth and clump-free. (Use plain grout mix without added pigments to prevent color shifts. We used a kitchen whisk to mix our paint.) Repeat the mixing process until you have enough paint to complete your entire project.
3. If necessary, prepare the wall with a light sanding or priming. Apply the chalkboard mixture to any paintable surface with a roller or brush. (We used two coats of our chalkboard paint to build up a thick surface.)
4. Allow the paint to completely dry, then sand the surface with fine sandpaper until you achieve a texture that accepts chalk. Next, "color the surface with the wide part of a piece of white chalk to get a chalkboard-like patina.
5. Wipe away excess chalk with a damp cloth."
(quoted article from Cottage Living, photo by Robbie Caponetto for CL)
October 1, 2007
Painted chalkboard kitchen wall
More:
kitchen ideas,
painting
![]()
September 7, 2007
Painted brick rowhouse - finished!
Ta-daaa! As promised, here are the photos of our latest project - painting the front of our rowhouse. The "before" photo was taken the night we went to closing, back in January 2005... seems like eons ago. I can't believe it had taken us so long to actually tackle the front yard. We went back and forth about painting the concrete walk and wall. It was John's thought to one day take remove the concrete walk and eventually lay down brick or pavers... but not a priority any longer. So, I painted it with some porch & concrete floor enamel to match the window sills. Planted some seasonal mums, and my eternal favorite (earlier this summer) potato vines, and viola! ...a whole new, crisp look.
The door we found at Lowe's about 2 years ago -- a special order Jeld-Wen (if anyone was interested) - it comes unfinished, blonde wood. I stained it twice and put several coats of spar varnish to protect it from the elements. It's held up pretty well. Door hardware is from Lowe's. I've been obsessed with the oil-rubbed bronze fixtures - we put them throughout our entire house....I'll show more on those later. And our mailbox, my splurge -- from Restoration Hardware. I would actually live in that store if I could... that, or Anthropologie of course. The chair was a trash-day find -- John spotted that one on the side of the road in Alexandria -- I painted it last weekend.


Before

Measure your transom, so you know approximately how large your numbers should be. Create a template in Word or Photoshop like the one below and print out (any font your heart desires!) Tape template to outside of your transom window, making sure that the numbers are level and centered. On the inside, using an $2.99 gold paint marker (similar to this one, found at Michael's), trace out the numbers. I used a straight razor to clean up my edges. If you mess up, or don't like the outcome - just scrape off and try again. So easy!
**If you have any good suggestions for increasing your curb appeal, please do share :) **
 (images by RowHouse)
August 13, 2007
Painted brick rowhouse
In the 90+ degree heat of mid-August, we decided to paint the brick on the front of our rowhouse yesterday... ourselves. No, this photo is not of our house -- I wish!! This is just a pic of my favorite section of London - Kensington - which provided the inspiration. I choose a cream color. Later this week we will probably do the molding in taupe and the windows in white. We are purchasing a new camera soon, so I will post before and after photos then.
**Note to self: never again paint the exterior of anything in August.
(Image via flickr)

More:
painting
![]()
August 8, 2007
Increase your ceiling height, the cheaters way...
So my friend Libby taught me about this technique, and I love it for two reasons -- It saves money on costly large decorative molding pieces and it saves time instead of replacing all of your crown molding.
Here's what you do: Mark about 3 inches below the bottom of your existing crown molding. Choose another smaller piece of decorative molding that will lie flush to the wall. Moldings can usually be found at any hardware store. Have your handy husband cut the new small molding and install at your 3 inch mark. Finally fill in the all the holes with wood glue and caulk, sand, and paint the entire segment (including the wall in between the two pieces) so as to give the appearance of one LARGE decorative crown molding. Trust me, this makes your ceilings look much taller and walls more grand, drawing your eye up. ...And there you have it!
Note: Always take into consideration door and window frame heights. I wouldn't recommend bringing the molding down lower than those frames.
If you have any questions, leave in the comments section below...
(Image via flickr, notations are my own)
July 20, 2007
Painting hardwood floors checkerboard

We did a much smaller version of this in our kitchen pantry 2 months ago. And normally I would not suggest painting over beautiful hardwood floors, especially old heart pine floors if you have them. I'm a hopeless romantic for old hardwood. However, in the event that you 1.) want a fresh change in one room... kitchen maybe? 2.) have a small space to experiment like a bathroom, or 3.) are planning to redo the floors anyway, this can be a fun DIY project. Here is a great how-to that I found archived on Cottage Living online.
Another great idea instead of going traditional black & white is to try mixing up the colors... think light brown & cream, or robin's egg blue & black on a screened-in porch. Or, only paint one of the squares, and the leave the other your floor's natural or stained color, then polyurethane over everything for good durability.
(Image from Cottage Living)
More:
DIY,
hardwood floors,
painting
![]()


